How to use an ERT test to unlock more constructive design conversations
📆 Published:
This technique helps us understand how stakeholders and users feel about the designs we create and gives us focus on what needs to change.
Techniques like the 20-second gut test help us to move our designs forward quickly and efficiently. It provides stakeholder consensus on the visual designs that best reflect their brand. But how do we know if the people using our products agree?
Introducing the ERT test.
What is ERT testing?
Section titled What is ERT testing?An ERT test is a research technique we use to understand how people feel about the designs we create. It enables more constructive conversations about the subjective responses people have to our designs. We can agree upon the emotional attributes we want our designs to embody. It also helps us to understand what aspects of our designs need to change to meet these standards.
ERT stands for:
- Emotional – The emotion and feeling evoked by a design.
- Response – The participant's subjective opinion.
- Test – The letter T stands for Test.
The process has the following steps:
- generate the test adjectives,
- build the test,
- conduct the test,
- analyse the results.
1. Generate the test adjectives
Section titled 1. Generate the test adjectivesOur initial goal is to generate an agreed list of around 6 pairs of adjectives. We do this by:
- Generating a long list of adjectives. Tone of voice and brand guidelines help us to quickly collect an array of potential adjectives. We can also consider adjectives that describe the purpose and goal of the product, or take inspiration from the Microsoft Desirability Toolkit.
- Refining into a shortlist. We use dot voting to refine the list to a maximum of 10 adjectives. We like to encourage discussion during this exercise and record reasoning for future reference. We listen out for the nuances of why one adjective is more appropriate than another. This step is collaborative so we prefer a workshop rather than a long thread of emails.
- Pairing the adjectives. Lastly, we need to give each of our shortlist of adjectives a contrasting word.
Pairing can be challenging. It's easy to default to pejoratives, for example, "exciting" and "boring". Personally, I prefer to test with a mix of adjective pairs. Some pairs framed positively/negatively and other pairs framed neutrally. This is because:
- With positive/negative pairs there's a risk of introducing bias into our tests. Participants feeling under pressure may fall victim to the Hawthorne effect, selecting the positive value they think the researcher wants to hear or the adjective they consider to be the 'correct' answer.
- We typically design products and services to be positive experiences for our audiences. When we test using positive/negative pairs we already know which adjective we want our scores to be weighted toward. This is useful when evaluating existing designs but less so when exploring new design directions and encouraging divergent thinking.
Instead, consider both adjectives to be framed neutrally, for example, "exciting" and "calm". In my experience, participants find these pairings more challenging to complete.
But this tension creates more interesting conversations which is the real value of this technique.
My rule of thumb is:
- Use pejoratives when we suspect a design creates a negative experience or contradicts the brand.
- Use neutral adjective pairs for all other occasions.
2. Build the test
Section titled 2. Build the test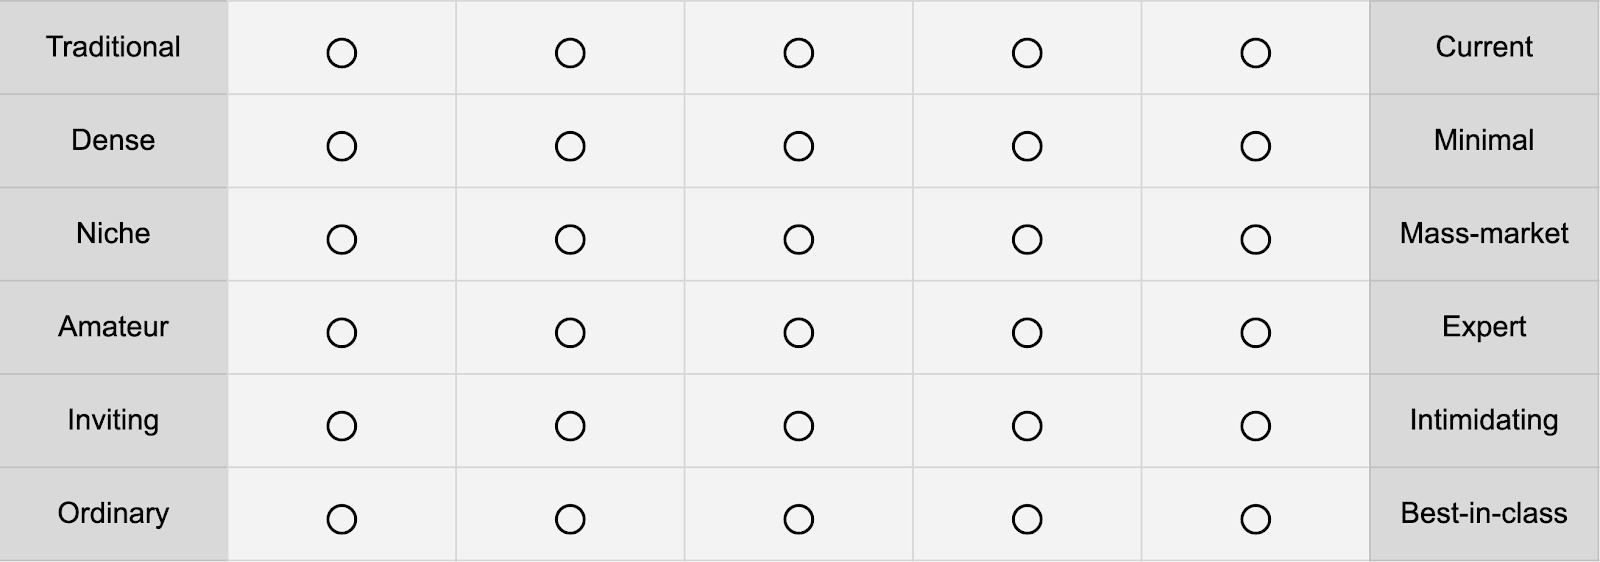
The design of the test is quite straightforward and quick to build:
- Create a 1×7 grid.
- Add 1 paired adjective at either end of the grid leaving the middle 5 blank.
- Repeat this for each pair.
The test is not limited to a 5 point scale. Choose whichever scale you have most confidence in, whether that be 5, 7 or 9. Whichever you choose the important thing is to keep consistency across all of your tests.
If you are testing with more than one design, duplicate the test for each one and contrast the results.
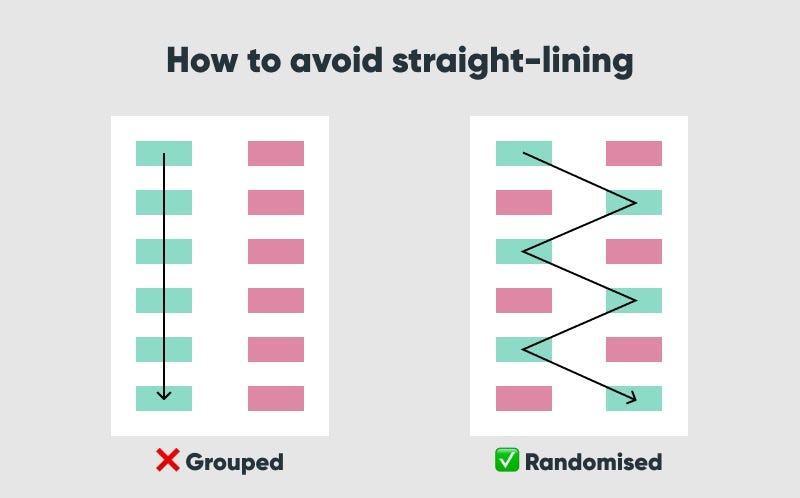
My tip: Randomise the horizontal order of positive/negative adjectives to avoid introducing straight-lining.
3. Conduct the test
Section titled 3. Conduct the testImmediately after completing a concept or usability test introduce the ERT test to the participant. We're testing for a gut reaction so the exercise should be completed fairly swiftly. 60 seconds should be ample. But it's important to allow for 5 to 10 minutes to discuss the reasoning behind their choices and identify what attributes of the design did or didn't support the desired adjectives.
This is an important step in the technique that will provide an added layer of qualitative insight.
My tip: Ask participants to describe the design in their own words before conducting the test to avoid biasing their responses.
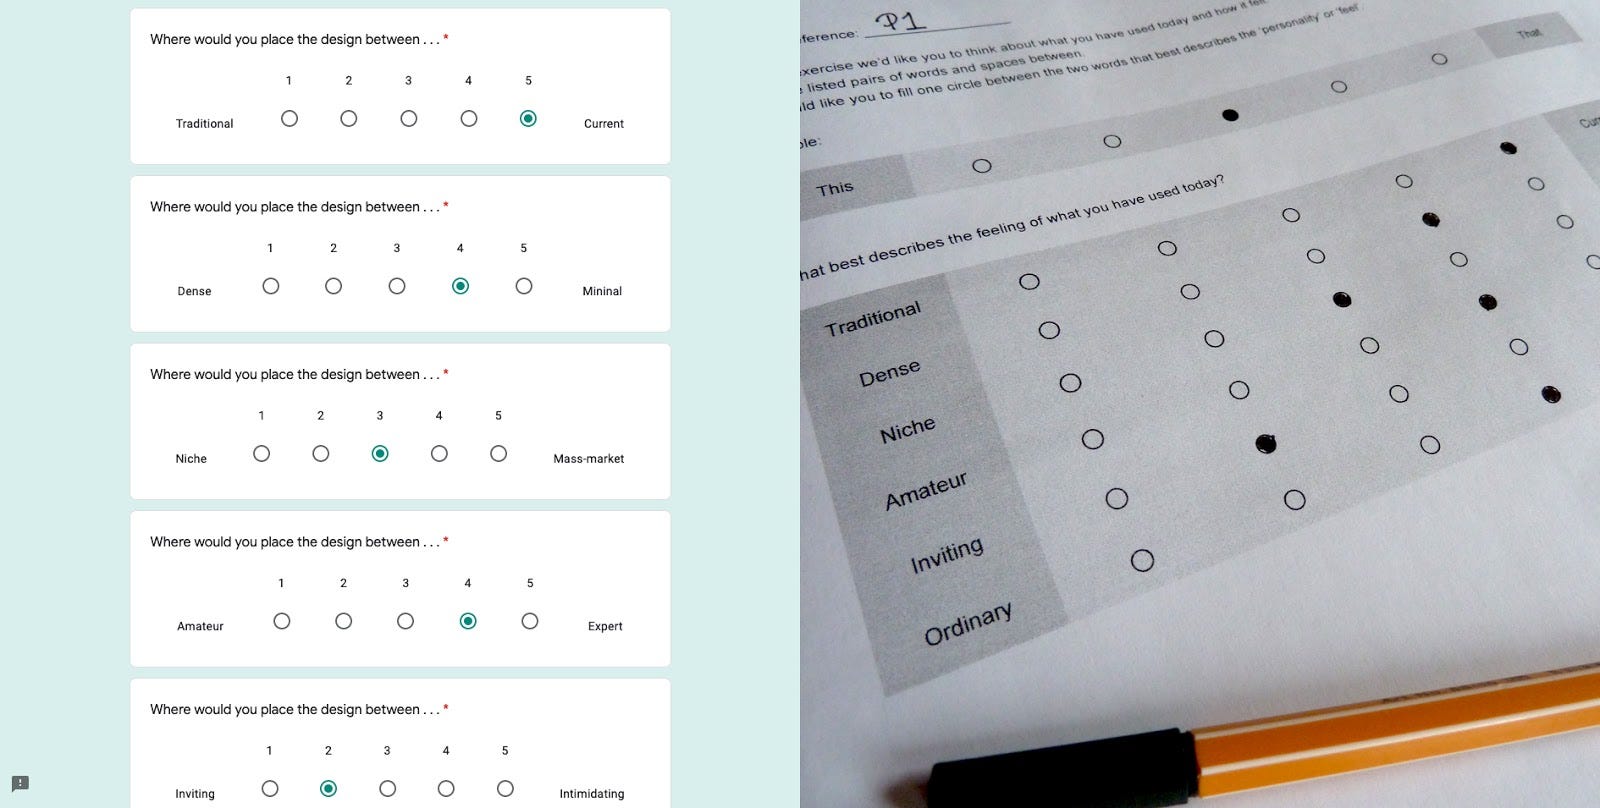
To complete the test the participant:
- reviews the first pair of adjectives,
- creates a mark in one of the empty cells between the adjectives that best describes the design output,
- repeats the process until each row has one mark,
- discusses the reasoning behind each of their choices.
My tip: Some participants will struggle with the process as a whole or certain adjective meanings. Offer reassurance to these participants to put them at ease. For example, tell them "There are no wrong answers…".
4. Analyse the results
Section titled 4. Analyse the resultsAlongside your qualitative insight, it's time to crunch some numbers in a spreadsheet to reveal the overall patterns of responses.
How the analyse the results:
- Create a master table for recording the results.
- Row by row, cell by cell, tally each participant's responses.
- Calculate the average score for each pair.
- Calculate the difference between the average and business goal (explained below).
I prefer to use a spreadsheet for analysis to reduce human error and take advantage of conditional formatting to improve readability.
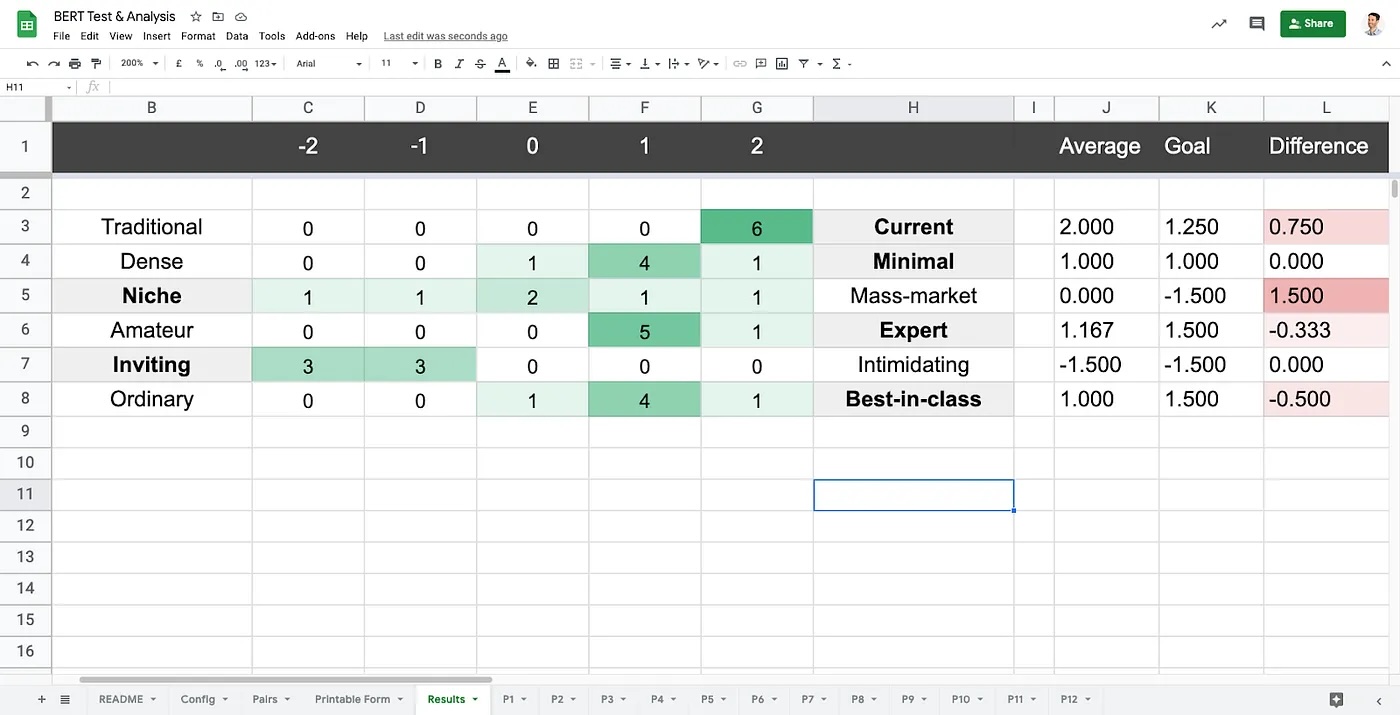
The analysis spreadsheet reveals:
- The spread of results.
- The strength of agreement.
- The average participant score.
- The difference between the business goal and the average participant score.
In the example below we can see that there is strong agreement that the design felt "current". Whereas the agreement is very diluted between "niche" and "mass-market". We can also see the disparity between the business goal and the average participant score, ideally we want the difference of these numbers to be as close to zero as possible.
Set a business goal
Section titled Set a business goalThis technique can also be used to align our team and stakeholders on the attributes and adjectives our designs should convey.
We can do this in two ways:
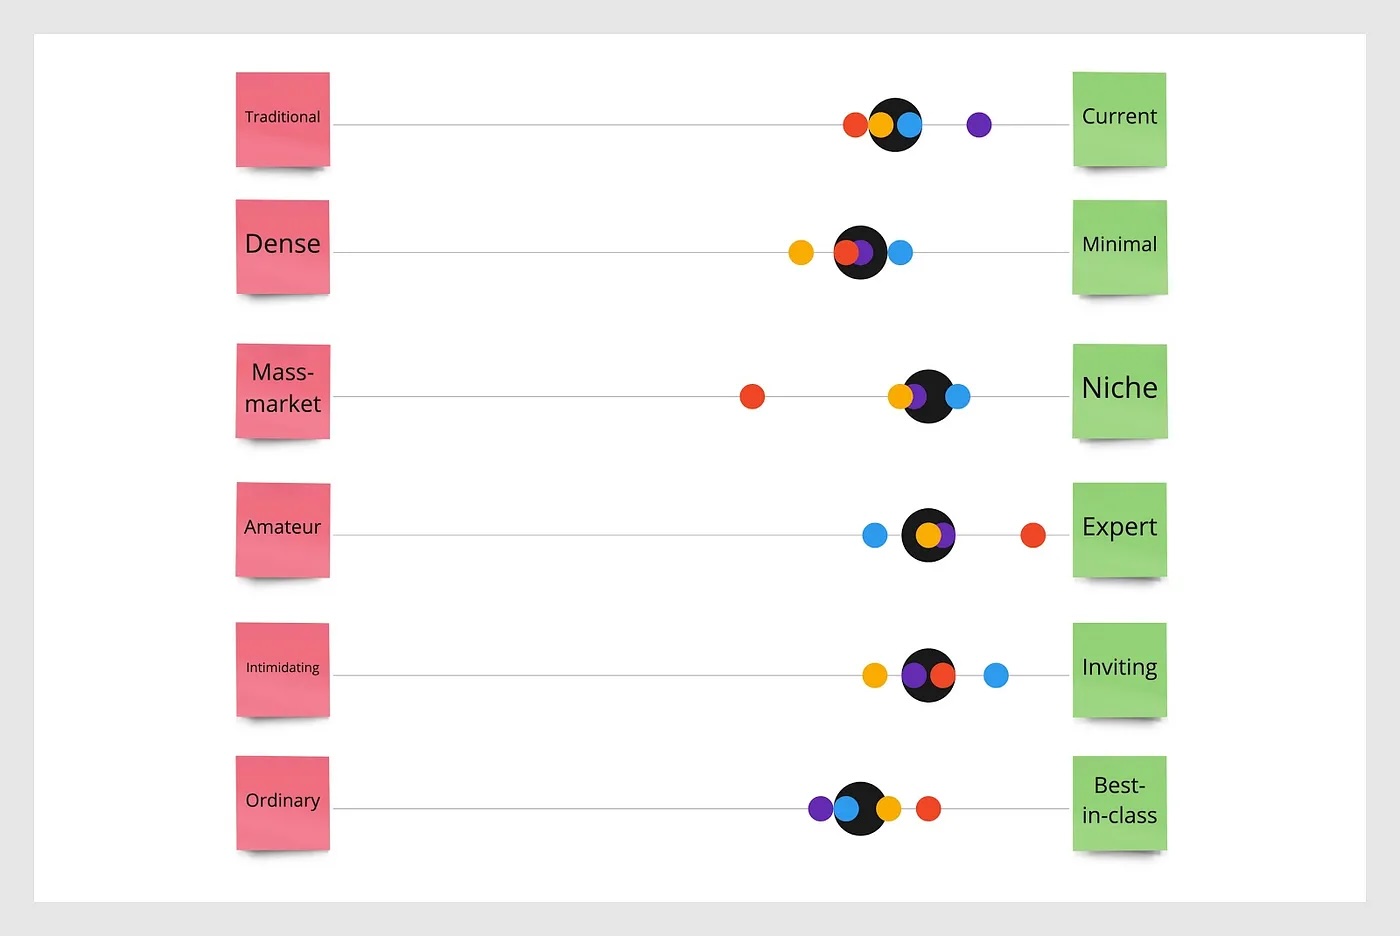
Formally through participation. We can conduct the same ERT test with team members and stakeholders as we do with our participants. This inclusive approach works well for stepping stakeholders through the process and giving every team member an equal voice.
To complete this process formally, each team member and stakeholder:
- reviews a design output,
- reviews the first pair of adjectives,
- creates a mark in one of the empty cells between the adjectives that best describes the design output,
- repeats the process until each row has one mark.
Informally through open discussion and by using a suitable collaboration tool (digital or physical). Start by creating a large version of the ERT test including the short list of adjective pairs. Ask the team and stakeholders to individually score the design along the scale using dot voting. Then as a group, discuss the responses and collectively agree a point on the scale that represents the collective business goal. This low-fi approach works well for collaborative teams who are close to the project.
Next steps
Section titled Next stepsThe ERT test is a collaborative and systematic process for testing the subjective viewpoints of our teams and customers. We have more constructive conversations about our designs. It reveals how our designs reflect our brand and what we should focus on in design iterations.
Why not add one in your next round of design research?
Resources
Section titled Resources- Download the ERT spreadsheet.
- Watch the Tiny Lesson video on the Clearleft website.
Like this post? Share it